 Back to all posts

Everybody is talking about AI generated text and the impact it could have in the coming decade. Some prominent SEO’s have declared that AI written content is here to stay, and it’s time to transition over.
But taking opinions at face value is often ill-conceived. We decided to put it to the test through a rigorous case study that involves two websites, hundreds of AI generated posts, and our Curated Links.
The results are in after 4 months, and the short and simple answer is… It works.
After just 4-months, we’ve generated $14k in revenue (not profit), and the sites continue to rank better each month.
We’re going to reveal the two pieces of AI writing software we used and break down the links we sent to each site. We’re going to look at what links we used, what pages we linked to, anchor text usage and everything else involved.
For this case study, we’re going to only specifically focus on one of our websites – as the process for building the second was the exact same.
Setting Goals For The Case Study
We had three simple goals when putting together this case study.
- Goal 1: Can we combine AI written content and link building efforts to rank sites in Google?
- Goal 2: Can we use that content to begin generating revenue?
- Goal 3: How do we scale the revenue into the 4+ figures per month?
The AI Writing Software We Used
We used two pieces of AI writing software – and both of them serve very different purposes. We set our sites in a structure whereby we have two forms of content running through them:
- Money Content: This content is designed to make us money. These posts are often focused on high-CPC keywords (for ads), product reviews, service reviews, affiliate links, and sales. We used BrandWell (formally Content At Scale) for this.
- Thematic Blog Content: This content’s purpose is to drive relevancy and thematic signals to our site. The content doesn’t necessarily earn us any money – but it drives strong topical relevancy signals. We used Copymatic for this.
BrandWell – For Money Content
The first AI writing tool that we used was BrandWell. BrandWell is quite honestly the most powerful AI writing software we have come across. It uses 3 different AI writing engines to produce posts that read like it was written by a human. We use BrandWell for all of our “money content” – content which we want to earn us money. Think of this as affiliate pages, review pages, etc.
Within those 3 engines, it looks at all of your competitors’ posts, and actively uses its knowledge of on-page SEO to try and improve upon what your competitors have written. The result is you get long-form content that reads well and is designed to rank highly.
- Enter a keyword and a 3,000+ word post is researched and written.
- 3 AI engines produce content that passes all AI detection software.
- In-built SEO software produces copy that is designed to rank well.
- Actively research your competitors’ articles and write content designed to beat them.
We’ll dive more into how we use BrandWell in the case study below. It is expensive, and it needs to be utilized correctly to have a chance at giving you an ROI. For everybody who wants to learn more about CaS, go ahead and read our BrandWell Review.
Copymatic – For Blog Posts & Thematic Content
The second AI writing tool in our arsenal is Copymatic. Copymatic isn’t quite as powerful as BrandWell, but it does have one major thing going for it – it’s significantly cheaper to use. It’s also more user friendly and quicker because it only uses GPT.
Copymatic uses GPT to produce blog posts that do quite well at passing AI detection software. The pass rate is usually around 60% – so we typically have to spend 5 minutes rewriting sentences to get an 80%+ pass score. That’s no problem – as it still saves us significant time over writing the posts ourselves.
Copymatic is best used to build out the thematic structure of your site. We use it to schedule blog posts every 1-2 days, which keeps our sites active and helps to build relevancy around certain themes.
- Writes 750 – 1,000 word blog posts in a matter of 15-20 seconds
- Generate everything – from blog posts to Google Ad text to eCommerce copy
- One of the cheapest AI writing tools on the market for producing bulk volume posts.
We’ll cover how we use Copymatic further in the case study, and why we don’t use it for our money content.
Case Study Introduction
We all know that quality link building strategy works extremely well – but there is a lingering stigma attached to AI written content. Google has made a statement already that it will index and rank AI written content, as long as it provides value to the reader.
But, how does AI content provide value to the readers? As long as it’s factual, and answers the searchers’ query – then it should be eligible to rank alongside all other pieces of content.
To be safe, we also wanted to ensure that our AI written content passed most “AI Detection software” tools. While Google is AI-friendly today, it may not be tomorrow. So every piece of content we generate gets run through AI detection software and has a quick proofread and re-write where necessary.
With BrandWell, we don’t have to worry so much – as their AI neural engines rewrite the content to such an extent that it’s nigh impossible to detect the difference between CaS and a human writer. With Copymatic – because it uses GPT – we had to manually rewrite parts of the content to ensure it passed AI detection software.
We stand firm in our belief that Google can and will rank AI written content – as long as it provides the user with accurate and worthwhile information. Sometimes, that means editing the content significantly and removing parts that aren’t factually correct. Proofreading is and will continue to be an important part of utilizing AI written content. Google needs to know that an author has reviewed the content, and essentially vouches for the content – or at least, that’s what we think makes the most logical sense.
With all of that said, let’s jump into the case study and run through what we did, and how we did it.
Step 1: Identifying Niches & Producing Content
Identifying the niches for the two sites is actually one of the less important parts of the case study. There are thousands of niches you can go after – whether it’s an informational site about Finance, an Amazon review site targeting kitchen products, or a credit card comparison site.
All we were really looking for is a niche that has relatively easy difficulty keywords, a large amount of long tail keywords, and question based keywords. Question based keywords are where there are searchers constantly asking questions – for example: “How much revenue does Amazon earn in a day?“. SEOs often forget that questions form a large part of the overall search market share – and these keywords can be monetized through display ad networks.
We also wanted to find a niche where there is a “donor site” we can effectively copy. By “donor site”, we’re referring to a site that already exists, ranks well for thousands of keywords, and has significant traffic. We can then plug this donor site into a tool like Ahrefss or Semrush, and quickly pull all of the keywords they rank for. We can then analyze their content, and figure out what we need to do to rank for similar queries to ultimately beat them.
The question is – do you start by finding the niche first, or finding the donor site first?
For us, finding a donor site first is what’s most important – although some people choose to find the niche first.
Finding Our Donor Site
How do you find a donor site? Pretty easy. Using Google, you’re going to be searching Google for topics such as “outdoors blog”, or a typical post – “how long does it take to jog a mile?”.
You’re looking at the sites that rank in the top three and aren’t obvious authority sites. You’re looking for niche websites that have been built and designed using WordPress and have a relatively simple navigation structure. You’re ignoring everything that is clearly an authority site – such as Forbes, the BBC, news sites, etc.
Don’t know where to start with your searches? Go after your hobbies – something you find interesting. If you’re into LEGO, try searching for “best Lego sets for kids” and find a donor site that way. Keep it simple and don’t overcomplicate it.
In our case, we found a great outdoor site that was built as a typical WordPress magazine site. The site covered everything to do with the outdoors – from fitness (jogging, cycling, etc), to camping, to covering the latest marathons and mountain treks.
This is fantastic for us – as we can monetize it in many ways. We can write reviews about jogging shoes and link to Amazon. We can write high value content and monetize it with display ads. We can link to health and weight loss CPA offers and write reviews on them. We can write “top 10” guides and sprinkle affiliate links throughout.
Extracting The Money Keywords
With our donor site in hand, we’re going to use a tool such as Semrush or Ahrefs to pull the ranking data for the whole site.
We’re going to be able to see every single keyword they rank for, the keyword difficulty, and the traffic – and that’s going to form the base of our whole strategy.
After plugging the site into Ahrefs/Semrush, we look at the organic research tool and pull a list of all their keywords.
From here, we use some filters to get the list down to a much smaller and more manageable dataset of keywords that we actively want to work with.
For this particular site, we went with something along the lines of:
- Keyword Difficulty (KD): 0-40
- Traffic: 300 minimum
We also have a neat little trick to extract keywords of a particular intent. This site, for example, had all of its product and service reviews nestled under a /Reviews/ category. As such, we repeated the search twice, but this time added a “/reviews” modifier to the keyword filter under “Advanced Filters” on Semrush.
This shows us all of the reviews this site has written and allows us to quickly identify all of the money keywords that we are probably going to be interested in.
It isn’t just reviews that we’re interested in though – so we’re going to do a third search.
This time, we’re going to filter by the “CPC” column and set a minimum of around 2.
This will allow us to find all of the informational keywords that advertisers are actually bidding on with Google Ads. If advertisers are bidding on these keywords, then they are probably also bidding on the Display Network and other networks like Ezoic and Mediavine. That means it’s going to drive us decent revenue on the display ads side too.
With these three reports extracted, and saved as CSV files, we’re pretty much ready to go with buying an expired domain.
Step 2: Buying An Aged Domain
This section is going to be short and sweet – because it’s mostly self-explanatory.
There are dozens of services out there that sell premium, aged domains that have dozens of links and have existed for 20+ years.
Some of the time, these domains have never actually expired and have simply been acquired without the domain actually dropping.
They work extremely well, and as long as you do the correct due diligence, you’ll be able to get your new posts indexed almost instantly.
You’ll be able to skip the dreaded Google Sandbox and get to work straight away with building a site that generates revenue.
Because you’re looking for a specific domain that matches the niche you’ve picked, we advise signing up with multiple domain brokers.
Some of the brokers we have experience with include SerpDomains, SEO.Domains and Domain Coasters.
There are a bunch of others too – but they all serve the same purpose.
Some of the things you want to pay attention to are:
- Pick a site that has a decent DA (20+)
- Look at CF/TF metrics, and avoid anything with a high CF and low TF. Ideally, you want TF to be as close to CF as possible.
- Manually analyse the link profile, and make sure those high powered links still exist and are still live.
- Look at the topical trust flow on Majestic – and make sure it’s a relevant match for your chosen niche.
- Look at archive.org, and make sure it’s never been used as a PBN.
- Ideally, you want the site to already be indexed in Google.
With all of those in hand – it’s up to you how much you spend. The more you spend, the stronger the domain typically. On our sites, we spent $1,000 on the first site, and $1,800 on the second site.
Step 3: Building The WordPress Site
We’re not going to dedicate much time to building out the WordPress site. Building a WP site is a matter of personal preference, and obviously requires you to be fluent with WordPress as a whole.
There are also so many different nuances with onsite SEO – what type of categories you use, the permalinks you use, whether you use silo structures, and so forth.
In all honesty, it’s best to keep it simple. Look at your donor site and what they’re doing, and try and replicate it. Pick a good theme that has a good PageSpeed insights score, is well optimized for SEO, and contains all of the functionality you need.
We build a lot of our sites using the Kadence Theme and would highly recommend it. Kadence has a whole bunch of pre-made themes and templates that you can install with the click of a button, and from there, build out your site. You can also take advantage of their Blocks plugin – which will ultimately allow you to build anything you need to do using simple drag-and-drop functionality.
To give you an idea of the site we built – it was built as a typical personal blogger site – with the homepage showing the latest posts, a nice logo, and categories linked to the menu. Nothing out of this world. As mentioned earlier, the niche for our most successful site was in the outdoors niche.
Step 4: BrandWell – The Money Content
And so we arrive at the fun part. Generating dozens of pieces of SEO optimized content using the donor site keyword research we did earlier.
We already have a list of thousands of keywords that can generate income if we’re able to rank for them. We just need some high quality content that is already SEO optimized. It also has to pass AI detection software too – because we want to future proof the site in case Google ever targets AI written content.
With that in mind, we fired up our secret weapon – BrandWell.
BrandWell is so easy to use, that it’s probably going to blow your mind. We intend on covering CaS in a full review later down the line, but for now, we’ll run through the basics of how to generate content that ranks using just a single keyword.
We only use BrandWell for our “money content” – content that we want to actively earn us revenue. That could be content for high CPC keywords, product reviews, service reviews etc. Anything that can generate us revenue.
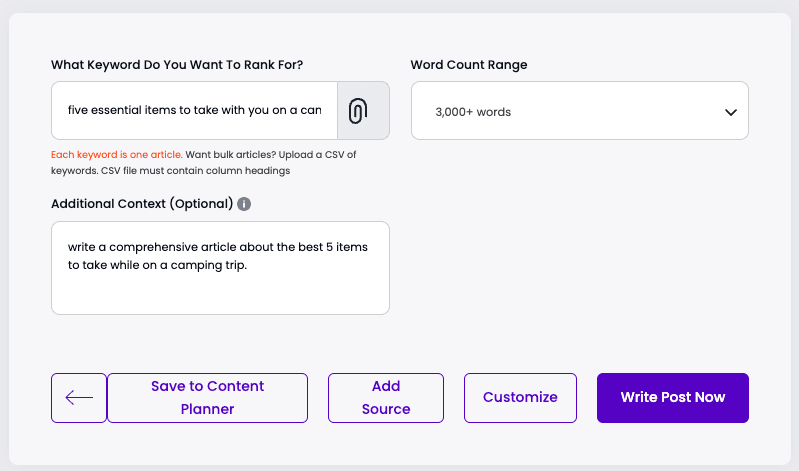
The process is really simple:
- Sign up to BrandWell, and create a new project.
- Fill out your site details, and write a brief introduction to the site.
- Set the word count to 3,000+ (more is better).
- Go into your project, and start generating money content using keywords.
The “Additional Context” is optional – we’ve generated the majority of our CaS content using just the Keyword field.
In just a matter of 10-15 minutes, you’ll have a 3,000+ word article that’s well researched and SEO optimized out of the door.
Step 4.5: Copymatic – The Blog Content
Once you’ve generated all of your money content, it’s time to jump onto Copymatic and start generating thematically relevant blog content.
Copymatic does an outstanding job of writing 1,000 – 1,500 word blog posts – but it does come with some drawbacks:
- The content isn’t as well researched and may need to be proofread to ensure it’s factually correct.
- Copymatic is drawing from a “bank of knowledge” when writing articles – so information may not be up-to-date.
- Because it only uses GPT – you will need to run it through AI detection software and quickly proofread/edit the articles.
All of the three steps are completely optional. We are sure you can simply copy/paste the content straight into your WordPress blog and reap the benefits from day one.
But with our sites, we just wanted to go that extra step to try and future proof the content.
The section you want within Copymatic is the “Blog Post Writer” – this is going to generate an introduction, and outline for your article, and generate all of the text in real-time. It’s fast – taking no longer than 1 minute from start to finish.
From there, it’s a very simple process:
- Let Copymatic generate the blog title for you
- Choose the most fitting intro for the post
- Pick the best set of headings/outlines for the article
- Generate the blog post
Once we had generated dozens of articles, we scheduled them into WordPress.
We like consistency – and so both sites had articles being published either every day, or every other day.
The WordPress post scheduling feature is powerful – so use it. It shouldn’t take you more than a day to schedule 3+ months’ worth of blog content.
With the money content generated and posted, the blog posts generated and scheduled – it’s now time to move onto link building.
Step 5: Link Building With Rhino Rank
We’re in quite a privileged position – in that we’re literally using our own links to rank the sites.
But we’ve been honest and transparent, and these two sites have generated more revenue than you would have spent on content and links.
In total, we spent around $8,000 on links for both sites – but for the purposes of this case study, we’re going to focus on one of the sites.
Site 1 had a total of $5,800 worth of Curated Links sent to it.
For those who are unaware – a quick run down. Curated Links are links secured on aged posts that already exist. We find aged posts that already exist on real websites, owned by real people, and then outreach to secure a link within them.
They drive authority and serious value – mostly because the content has already amassed authority within Google’s index. No sitting around waiting for Google to index and cache the posts.
Step 5.1: Getting The Anchor Text Ratios Right
The most important thing to focus on when building links to a new site is the anchor text ratios. We recently wrote a comprehensive anchor text optimization guide for this reason.
With it being a new site, driving branding is the number one priority. We need to build the brand and get some initial trust established.
As such, for the first few orders, our anchor text ratios were along the lines of:
- Branded Anchor Text (50%)
- Generic Anchor Text (10%)
- Partial Match Anchor Text (25%)
- Exact Match Anchor Text (5%)
- Descriptive Anchor Text (10%)
You’re probably familiar with all of the above types of anchor texts. The most common one we hear questions about is the “Descriptive Anchor Text”.
Descriptive Anchor Text is literally describing the page in a few words (or even half a sentence).
If we take Amazon as an example, and want to link to their page on food processors, then some descriptive anchor texts could be:
- “this processor has won several awards”
- “get a processor that has strong blades”
- “always go with a reputable brand”
The main thing is to keep it natural. Imagine a blogger is actually linking to you. Think about how they would link to your page. People don’t naturally link to other pages using the term “best cheap food processor” – so avoid being too aggressive.
Step 5.2: Curated Links… But Which Ones?
Packages. Packages. Packages.
We have five packages to choose from – and they are built in such a way that allows you to maintain complete control of your link building campaign.

You can view all of our Curated Link Packages in the client dashboard.
They contain a perfect mixture of low-grade, mid-grade, and high-grade links – and all of them serve a purpose.
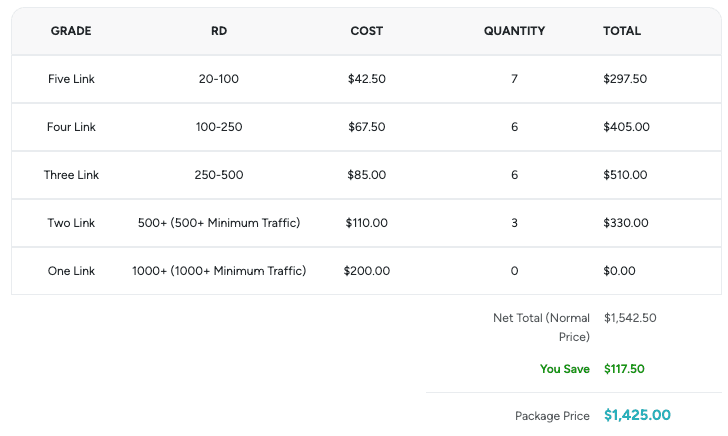
Here’s what Package 3 looks like:
Here’s how we used our packages – while focusing on anchor text ratios:
- Grade 2 and Grade 3 links were used for Exact Match and Partial Match keywords.
- Grade 4 links were used for descriptive anchor text, and branding.
- Grade 5 links were used for branding and generic anchor texts.
Hopefully, now you can see why we build our Packages in the way we do.
The higher-grade links drive more authority – so we use them for our exact match keywords.
The lower-grade links are perfect for building our anchor text profile naturally.
A winning combination.
Step 5.3: Choosing Where To Send The Links
There’s no need to overcomplicate where to send the links.
We want to rank our money content, and we want to drive trust and authority to the homepage.
We picked 4-5 money content pages that we thought would have the best chance of ranking.
We looked at the Keyword Difficulty scores we pulled earlier, along with their CPCs and traffic estimates, and decided which pages to send links to.
With that in mind, here’s how our link distribution went:
- Homepage links: Roughly 30% of all links went to the homepage, with mostly branded anchor text and some descriptive anchor text.
- Inner Page links: 60% of links went to money content – the 4-5 pages we wanted to actually rank and start generating us revenue.
- Blog Post links: 10% of links went to blog content.
The blog posts have strong internal linking to the money content – so we weren’t too concerned about wasting link equity.
Next up – placing the orders in our client dashboard, and waiting 14 days for the link deliveries to appear in our account.
Step 6: Monetising The Content In Preparation
With our links being built and delivered, it was time to start monetizing the site in anticipation of ranking improvements.
There are literally tens of thousands of affiliate programs, and you can earn money from your sites in ways you wouldn’t think possible.
You can do product reviews and earn money from Amazon Affiliates, or you can send traffic directly to manufacturers’ sites.
You can write an eBook that contains a comprehensive guide, and sell it to your visitors.
In a nutshell, here are some of the ways we monetize our content:
- Ezoic Display Ads: Ezoic is fantastic for new sites as there are no minimum traffic levels. You can expect roughly $10+ CPM. We turn Ezoic off on “money content”, but leave it on with our blog posts.
- Amazon Affiliates: If it’s on Amazon – promote it. The only downside to Amazon is their low affiliate payouts for some categories. As such, consider other vendors such as direct from the manufacturer, Walmart, or other eCom sites.
- Guest Posts / Niche Edits: You can sell links on your site. You bought an aged domain after all. If it’s well maintained and has strong metrics, you can often earn $100-$200 per link.
- Service Reviews: Just like this case study – if you use a product/service, and it’s relevant to your niche, then promote it. SaaS platforms pay especially well. Did you know that VPN services can often pay $50+ for a single sign-up?
- Email Newsletters: If you have an engaged audience, then get them on an email newsletter. You can use that newsletter to promote relevant products/services, and even sell advertising within the newsletter.
- … and the list goes on and on.
Building and running profitable niche sites is about being creative. You have to think outside of the box and come up with a plan on how to monetize your audience.
If Google was to gift you 20,000 visitors per month – how would you monetize them?
Think about it in advance and have a plan – because every single dollar is going to matter.
Step 7: The Grand Finale – 4 Months Later
And so, after going through the whole process – from finding the niche to monetizing the content, we land at the grand finale.
4-months later, we’ve produced and published over 200+ pieces of content on the site.
We’ve been publishing blog posts every 2 days courtesy of Copymatic, and we’ve been publishing money content every day thanks to BrandWell.
The Curated Links we ordered have done their job, and the rankings, traffic, and keywords are all climbing every week.
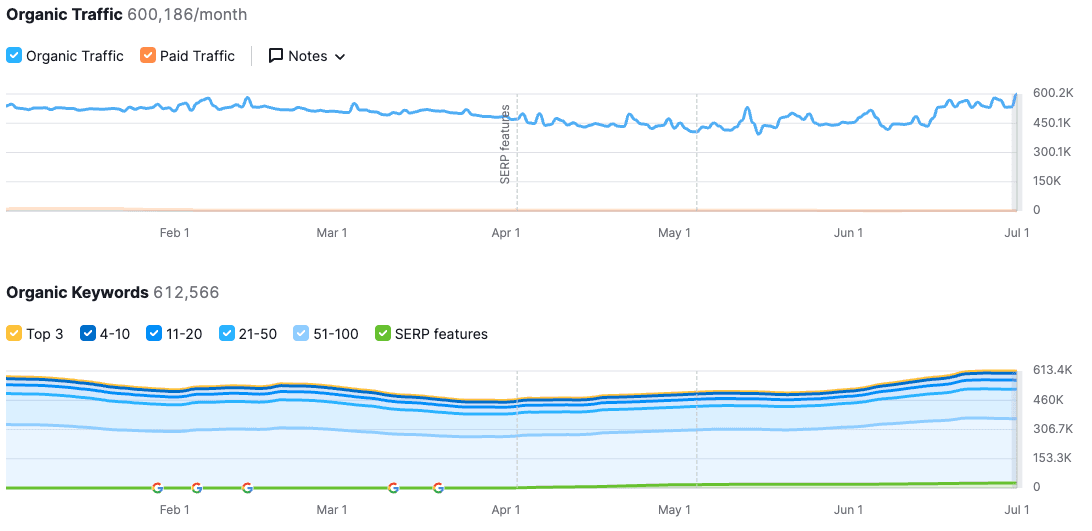
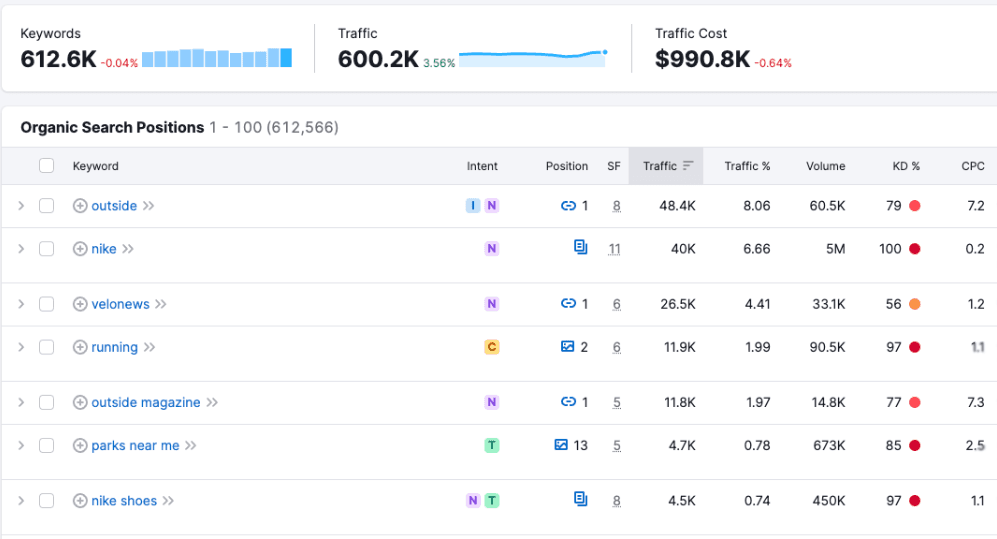
The site we’re going to be covering in this case study currently has 15,000+ keywords in Google’s index and has generated $9,400 in revenue so far.
Over 15,000+ keywords in Google’s index:
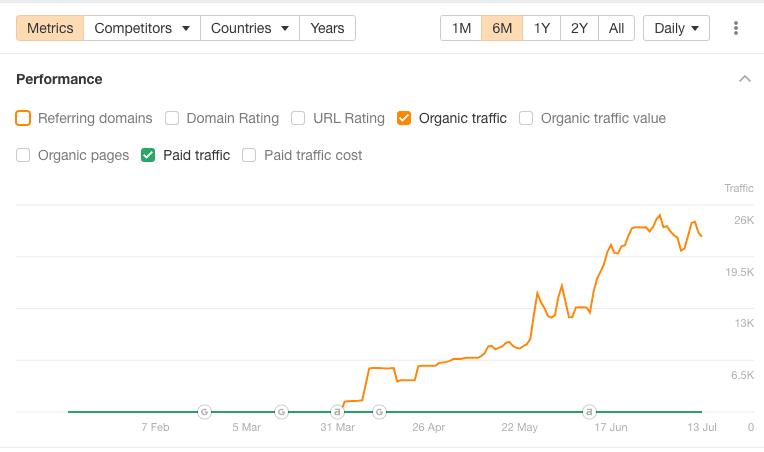
Over 22,000+ traffic per month:
Here’s everything you need to know:
- 15,000+ keywords in Google’s index (according to Ahrefs)
- 22,000+ traffic per month (Ahrefs estimate)
- $9,400 revenue generated over a 4-month period
To date, our total outlay for this site was $1,800 on the aged domain and $5,800 on Curated Links.
There are other expenses too – such as domain hosting, a few premium plugins, a premium WordPress theme, Invoicely, and a few others.
All in all, our total expenditure for the site is in the region of $8,000.
We’ve generated $9,400 in revenue – giving us a profit of circa $1,400 by month 4.
For those interested, here’s a very crude breakdown of revenue:
- Guest Posts / Niche Edit sales: 10%
- Affiliate Income (Products): 45%
- Affiliate Income (Services): 35%
- Display Ads: 10%
Over time, we expect Display Ads to form a much bigger percentage of revenue – and we expect to swap over to MediaVine – since MediaVine often has higher CPM’s. MediaVine has a 20,000+ pageviews minimum requirement, which makes it unsuitable for new sites.
We earned just over $800 by selling 4 guest posts on the site. Because our site is highly relevant to a specific niche, we’re able to charge a premium for selling links on the site. The main thing we consider when selling links on the site is keeping it consistent with the site. We charge a premium ($200+ per guest post), and we ensure every site we work with is highly related to our site, and our audience.
The bulk of the income came from Affiliate Income – both promoting products and services. We signed up to Amazon Affiliates and use that to promote dozens of different items (from tents to backpacks). We also signed up with other eCommerce stores where we thought the affiliate rates were better. Other income came from promoting services – such as car rental, motorhome rental, and even mountain hiking trips.
Step 8: Wrapping It All Up
Does AI content work? Yes.
This case study has proven to us that you can use AI written content on your site to rank for keywords, and drive traffic.
And, combined with the power of Curated Links, it’s a winning strategy that will hopefully yield revenue for many months and years to come.
But, as always with the SEO industry, the true success of the case study lies in the details and the ability to go above and beyond what others do.
We actively invest in what we’re doing.. Without spending money on backlinks, it’s highly unlikely that our sites would have ranked at all.
But for everybody wondering whether there’s money to be made with AI content and SEO – we believe the firm answer is yes.
And some people are already making 6-figures a month from AI written content.

We know of a few hard-hitting SEOs who have full fledged VA teams set up, building sites, and generating content all day. They’re fully invested in the AI and Link Building boom.
As long as you’re proofreading the content, and editing it to make sure it’s factually correct – then Google should reward that content.
The SEO industry is all about testing what works, and what doesn’t. There’s no rulebook or degree for SEO.
And hopefully this case study has given you a bit of oomph to go and run your own case experiments and case studies.
related Blog Posts


Join 2,600+ Businesses Growing with Rhino Rank
Sign Up
Stay ahead of the SEO curve
Get the latest link building strategies, SEO tips and industry insights delivered straight to your inbox.